How to Build Your OpenCollar
This page explains how to build an OpenCollar.
All the contents of OpenCollar V 7.4 and after are in the root prim. You will need a separate leashpoint and Floattext prim. Other optional parts, like Bell, Lock, and Label, may require extra prims.
To build a collar yourself you need only basic inworld building skills with standard prims. If you can make a standard prim of any shape, texture prims, do simple tortured prims, link prims, edit linked prims, and load contents, you can do this. If this is beyond you, consider taking a basic building class–it will pay off down the line in many ways.
Scripts
To get the scripts, open the current OpenCollar updater and save the contents to your inventory. Discard the notecards named BUNDLE and the two scripts named oc_transform_shim and oc_update_shim as these are used to run the updater.
Notes on Scripts: The links on this page will take you to the OpenCollar script repository on Github.
- The scripts in the repository are a running update and may be more advanced than the current inworld release. Use them at your own risk.
- Keep note of the most recent updates here as well.
- If you modify a script that came from an updater or another collar, it might have the OpenCollar Experience checked. This is just a signature telling inworld help whether the script has been modified. To modify the script, uncheck the Use Experience box at the bottom left of the script window when the script is open. Here is the list of scripts that go in the collar:
REQUIRED CORE
INTEGRATED. These scripts can be removed without breaking the collar but have integrated menu functions:
- oc_anim / oc_couples (required to use collar animations and sync to OC AO).
- oc_rlvsys, oc_rlvsuite (required to use collar rlv restrictions and reach the relay menu), oc_rlvextension (required for Restrictions)
- oc_folders (required to access wearer’s #RLV folders for force wear).
- oc_leash, oc_particle (required to operate the leash).
- oc_relay (required only if you want to allow restrictions by objects you do not own) Note The github version of oc_relay is an experimental, fast On/Off internal relay. It will not drive the Turbo Safety HUD Relay issued with OpenCollar V 7.5.
- oc_resizer (required to use menu driven resizing and positioning)
- oc_themes (needed to hide and show the collar).
DESIGN TOOLS. Use these scripts if your collar design calls for them:
OPTIONAL APPS. These are apps provided in the OpenCollar updater you may include.
oc_bell, oc_bookmarks, oc_capture, oc_detach, oc_outfits, oc_presets, oc_titler, oc_undress.
OTHER RESOURCES. Also copy from the updater and load, the license and help notecards, the leash holder, the relay objects, and all animations.
Materials
You will need at minimum:
- Collar Band
- Leashpoint Prim
- FloatText Prim
The collar needs to be at least 3 LI for the scripts to be stable.
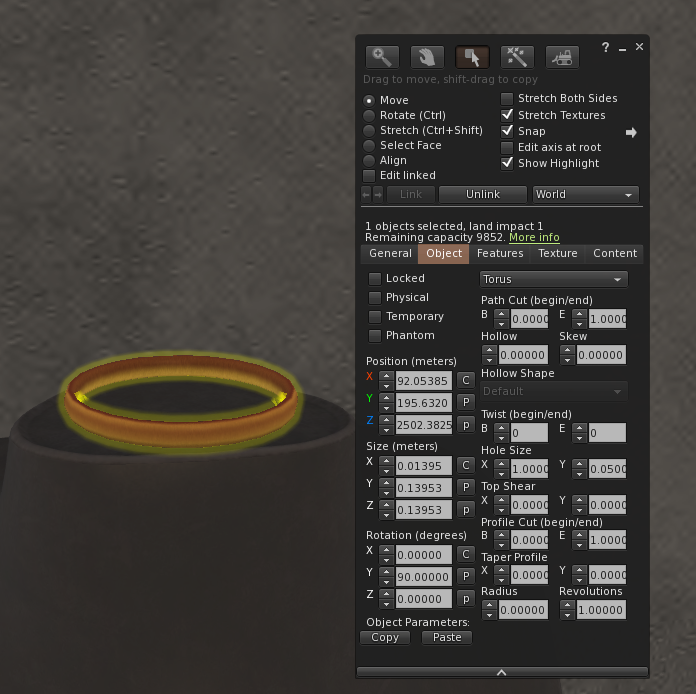
If you don’t have an object you want to use as the base for your collar you can make a simple torus. In the build menu select Torus as the shape, give it any texture you like, and use the approximate dimensions illustrated.
- Add a tiny invisible prim named
leashpointand in the description field putleashpoint~notexture~nocolor~nohide~noshiny~noglow. Position the leashpoint so the center of the prim is on the spot where the leash will emit from. For instance if you are using a mesh collar with a ring, position the leashpoint prim so the center of the prim intersects the bottom of the ring. Link it to the collar. Wehn you link the prims, always shift-select the prim that contains the scripts and other contents last. This will ensure that the contents remain in the root prim which is alway the last prim selected when you make a linkset.
Optional Parts
- FloatText prim. Create a cylinder with a diameter just smaller than the collar band, align it in the collar. You can also use a tiny cube positioned at the back of the collar. Name it
Floattextand in the description field put:FloatText~notexture~nocolor~nohide~noshiny~noglow. If you don’t use this prim, the titler app will still work but it will not be positionable. - Bell. If your collar has a bell, name the bell prim
Belland put in the description field:Bell~nohide. Requires oc_bell. - Label or Meshlabel. If using a traditional prim label, you will need the script oc_label in the collar. Make label prims and align them on the collar band. Number each prim as follows:
Label~00,Label~01,Label~03, etc and in the Description field of each place the stringLabel~notexture. If using a meshlabel, these instructions assume you know how to make a label prim with up to 8 faces in a 3D graphics program and upload that to SL. Name your primMeshLabeland align and link it to the collar. The current Stock Collar uses four (6) face prims, named consecutivelyMeshLabel~00throughMeshLabel~03. Requires oc_label or oc_meshlabel. The texture, scale and offset for each face is assigned in the oc_meshlabel script, along with the description field of the MeshLabel object. - Lock. The Lock should have different prims to represent a closed and open lock, and toggles with the collar lock. The ClosedLock prim, which shows when the collar is locked, should have in the description field
ClosedLockorLock. The OpenLock prim, which shows when the collar is unlocked, should have in the description fieldOpenLock. - Settings notecard. If you want to save or hard code settings, make a notecard named .settings and place it in the collar also.
- Make sure you link any extra prims to the collar, selecting the root prim last.
Compiling your collar
The last step is to load the scripts into the collar. Do this with moderate speed, letting the asset server catch up to your work as you go along. IN THIS ORDER:
- Rez the Updater.
- Rez the collar model.
- Find the script oc_update_seed and drop it into your collar model. If you want to skip the steps for building the leashpoint and FloatText prims, and use the prims that are in the updater instead, you can use oc_collarizer . It will add and link those prims for you, but you may still have to position them where you want.
- The update will start.
Notes
- The relay script can be deleted without harm to the rest of the collar. If the wearer has an alternate relay, wearing two relays is inadvisable.
- Meshthemes and themes are used for different types of collar build and are not compatible. Use one or the other depending on your build. You don’t need to use either unless your collar will have alternate textures.
- Meshlabel and label are used for different types of collar build and are not compatible. Use one or the other depending on your build. You don’t need to use either unless you want your collar to have a scripted label.
- It is possible to use Rigged/Fitted Mesh collar bands, but they will slightly complicate the build. First, they may not be clickable for the collar menu, which you can work around by including a large invisible prim to cover the collar and serve as the click target. This can, but need not be, the root prim. Additionally, all extra prims (e.g. leashpoint/Bell/FloatText/Locks) linked to the collar will have to be positioned after the collar is attached to an appropriate point, such as Chest or Neck, depending on where the collar is rigged to at the place(s) where said prims need to be. Once positioned, it is unlikely the extra prims will be correctly positioned should the avatar adjust its shape, meaning OpenCollars made in this way must be customized to each avatar.
Posts
subscribe via RSS